One common request from many customers is how to make a sign-up sheet. There are a couple of ways this can be handled within the software, either as an Online Form, or as a table on a page.
Online Forms
In cases where you want to send users to a form to fill out, you can create an Online Form to handle the sign-up sheet. Depending on the reason for the sign-up sheet, you can even add in triggers to ask additional questions for users to fill out.
For example, if you are creating a form to get numbers for an upcoming event, like a Christmas party, you can add a radio button that says 'I will be attending' with a Yes and No options. If selecting 'Yes', additional questions can be provided (e.g. Will you be bringing your partner/spouse?, How many children will you be bringing, etc).
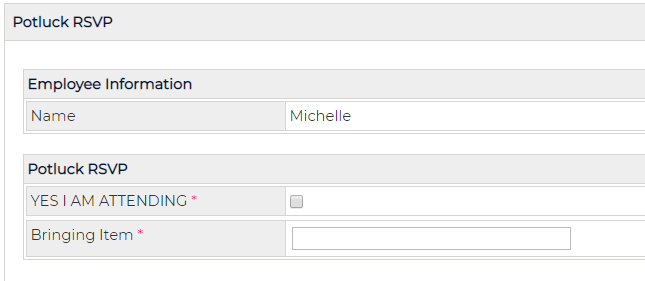
Below is an example of a simple sign-up sheet that automatically collects the user's name using a 'User Data' field.
If you're using a sign-up sheet for a potluck, you may need to request users to check previous submissions so that they can see what others are bringing. To do this, you'll need to allow all users the ability to view all responses:
- Navigate to the form > edit
- Click the Security tab
- Scroll down to the section called 'Who can see the form responses'
- You can assign users or groups, or both, to be able to view all form responses.
- This is recommended so that users can only see all responses to this particular form
- Save your changes before navigating away from this page
Considerations
Here are some additional things you may wish to consider implementing for your form:
- Submission limit - To make sure users don't accidentally submit more than one entry, you may wish to limit responses to 1 per person. Edit the form > click the Details tab > enable 'Once with reset' and save your changes.
- Categories - If you're doing a potluck, I would recommend having a field that identifies if they're bringing Appetizer, Entree, Dessert, etc. If the information needs to be split up by department, consider the User Data field with 'Department' selected to automatically fill the department of each logged in user.
- Views - Each form comes with a default view of Submission Date and Submitted By. If you're requesting that employees view the responses from other users, modifying this view will make it easier. Edit the form > click the Views tab > drag over the fields onto the provided 3 columns (you can add more as needed). The top field in each row will be the column header. This way users can sort as needed. If you have a category, you can drag that category to a column to be used as once of the sorting options.
Table on a Page
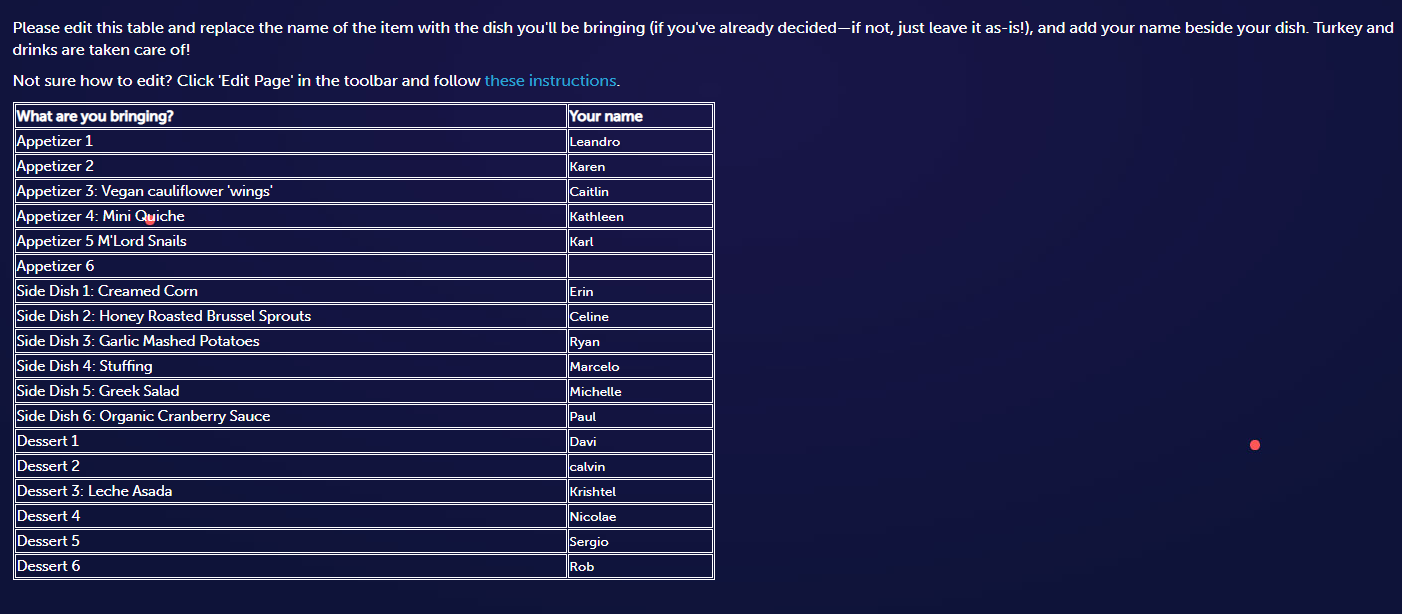
If you're looking for something more visual to show what is still needed and who is bringing what, then a table on a page would be a great recommendation for this. An example of how this may look:
In order to make this work, users will need to be able to make changes to the page.
Create a page:
- This page was created by navigating to a Site that all users have access to (either Home or another team/department site)
- Click the + icon beside Pages
- For more flexibility of being able to add other information to the page, we recommend selecting a Widget page
- Click Build
- Add a new widget
- Select Simple Widgets > click Message Box
- Use the HTML editor options to add a Table:
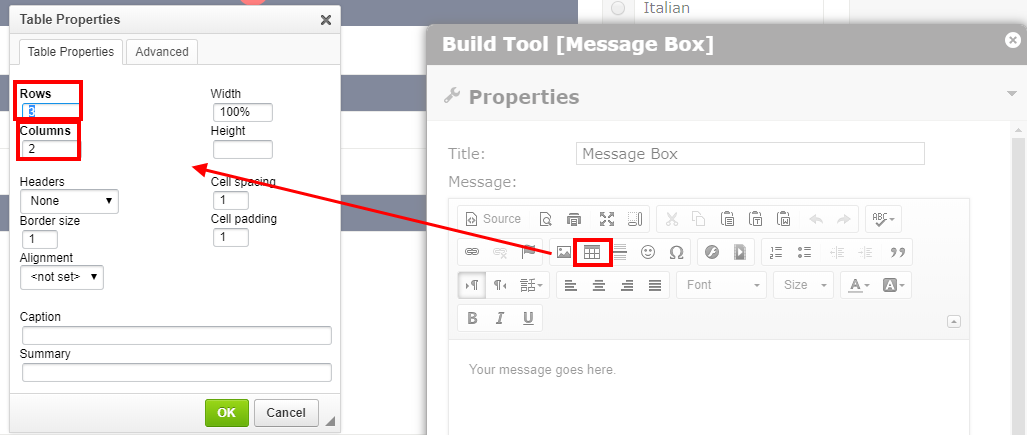
- Rows - use this for each line to indicate users or food type/category type (don't forget to count the top row which indicates the information being entered in the rows below)
- Columns - In the example above, there are 2 columns (one for what is being brought, and the other for the name of the employee)
- Adding more rows/columns - you can add more later if needed by right-clicking on the table > hover over Row/Column > select to insert new row/column
- Click Save Widgets at the bottom of the screen
Groups
Users will need permission to edit the page. You can either make all users page owners for the page by assigning an All Staff group as page owners (if you have an All Staff group). If you don't have an All Staff group, you can add one in the software:
- Navigate to Admin > Security tab
- Click 'Create a group'
- Name the group (i.e. All Staff)
- Click on the top user listed and hold ctrl + A, this will select all users
- Click 'Save' at the top of the screen
Assign Page Owner
- Access the page by going to Admin > Assets > select the site you created it under > click Pages > click the page card
- Click Page Owners from the right menu
- Select the All Staff group you created
Note: Page Owners have full rights over the page and have the ability to add/edit widgets, as well as update the current content.
Considerations
- Navigation - Newly created pages aren't linked automatically. Be sure to add a link to the new page which can be added through a menu widget.
- Linked Image - Add an image to the homepage to draw attention to the employee sign-up sheet. Copy the URL from the address bar when on the page (access the page by going to Admin > Assets > select the site you created it under > click Pages > click the page card > click Go To Page). Use an Image widget to upload the image and add the URL as desired.