
Permissions
Before configuring the Intranet with your Outlook Exchange settings, review the following:
Exchange Web Services 'Account'
The Exchange Web Services 'Account' requires:
- A mailbox
- Can successfully authenticate to the Web Service URL when prompted for login credentials
- View access rights to all content for each selected calendar
- Depending on the information you wish to view in the widget, Full Details access may be required
Calendars
Required settings for calendars:
- Must have a mailbox (Public Calendars and Resource Room Calendars do not have a mailbox by default)
- Must be shared with View rights to the Account defined in your Exchange Web Services settings
- View rights may not include the full details of each event pulled in from the calendar, as a result, you may need to allow Full Details access to the Account for each calendar
- Only meetings are displayed - All events must be accepted by at least one recipient in order to appear on the calendar
Configuration
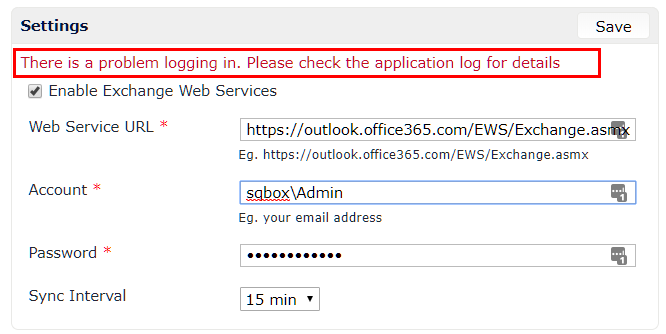
If the mailbox of your account doesn't match the login (e.g. mail@domain.com for the email, and Domain\mailaccount for the login), you'll see the error 'There is a problem logging in" as shown below. Please check the application log for details' when you save your connection settings. Ignore this error and try adding the email addresses of the desired calendars and proceed with adding in your Exchange Synchronization widget.
This widget cannot be linked to Exchange servers with Multi Factor Authentication enabled
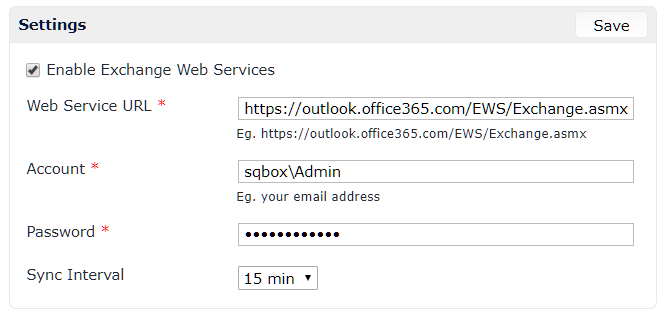
Settings
In order to configure your Outlook Exchange calendar within the Intranet, follow these steps:
- On your Intranet, click the Admin link on the top right of your screen
- Under the Setup tab, look for the Extensions column and click Exchange Web Services
- Check the box beside Enable Exchange Web Services
- Enter the web service URL (e.g. https://outlook.office365.com/EWS/Exchange.asmx)
- If using 'https' in the URL, add the SSL certificate to the Lucee Server Admin
- Enter the Account Username:
- Domain\username
- Username only
- Email address
Authentication Process based on your Account type:
- Domain\username
- For Domain accounts, our software will translate the username into an email address based on the Exchange URL being used (e.g. https://mail.outlook.com will add '@outlook.com' to the username).
- If the username doesn't match the email address, it'll return an error for the connectivity test, however, you'll be able to add your calendars and see events in the Exchange Synchronization widget.
- Username only
- For Username accounts, our software will append the domain from the EWS URL to the username (e.g. username@outlook.com)
- Email address
- The email address won't be formatted and will check for a matching mailbox account on the mail server.
- If your email address and login don't match, it'll authenticate but return a connection error (this can be ignored)
- Enter your password for this account
- Set your sync interval (how often the software will check your account for updates to the calendars)
- Click Save
Calendars
The next step is adding your desired calendars to the list; this list will appear within your Exchange Synchronization widget. To configure your calendars, follow these steps:
- Select how far back you'll be synching events from your calendars to display in the widget
- Each calendar will sync a maximum of 1000 events or up to 500 days
- Custom allows you to select ranges for each calendar individually as desired
- Enter the email addresses of each calendar to sync and click Add
- Click save and sync
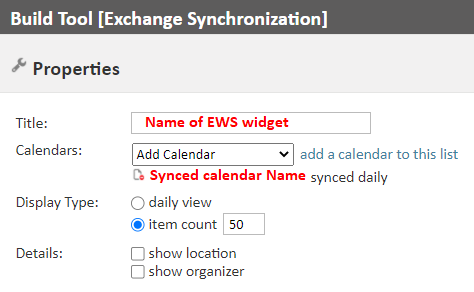
Exchange Synchronization Widget
The last step is to configure the widget to display your calendar content. This widget displays events from your selected calendar(s) in a list format. To add this widget, follow these steps:
- Navigate to your desired widget page (e.g. Homepage)
- Click Toolbox > click Edit Page
- Add a Widget to the page
- Select External Content from the Build Tool
- Click Exchange Synchronization for the widget type
- Click the drop down box to select from the calendars available
- You can add multiple calendars
- You can color code the calendars to indicate events from the same calendar
- Click Save Widgets
Troubleshooting
Authentication
If you can't connect to your server, Microsoft offers a connectivity test tool to assist: https://testconnectivity.microsoft.com/tests/EwsTask/input
- The above link should take you to the Microsoft Remote Connectivity Analyzer, specifically within the Synchronization, Notification, Availability, and Automatic Replies are where you can test your EWS connection details.
- Fill out the email address, domain\user name, and password
- Select 'Specify Exchange Web Services URL' with the appropriate URL (e.g. https://outlook.office365.com/EWS/Exchange.asmx)
- Check the box for the acknowledgment
- Enter in the Captcha code provided
- Click 'verify'
If any of the steps fail, the issues will need to be addressed within your Exchange server by your Mail Administrator. If the test is successful, our software should be able to connect using the same account.
Logs
If you encounter the error 'There is a problem logging in. Please check the application log for details' when saving your connection settings, please grab the log file and send it to our Support team for review.
To locate the log file:
- Navigate to Admin > Setup tab
- Click 'Global Config: Errors & Logging'
- The current log level should be set to 'Error' by default, if not, save this change and try saving your EWS connection information one more time before continuing to the next step
Scheduled Tasks run in the background to connect and sync your calendar details with your widget.